If you have been following my blog posts regarding Jane’s Ladder, you’ll know that the last time I left off, I had finished piecing the quilt, sewn it together and realized all the mistakes I had made. My next step was ripping most of the quilt apart. I did this over the course of several evenings and then re-pieced the quilt together again. I now have all the white and patterned diagonals matching. I wish I had laid it out so all the dark squares were in a diagonal row; all the pinks, all the yellows and greens and whites, but I didn’t. Maybe the next one.
One thing I didn’t mention in my first post about Jane’s Ladder, was the importance of making sure your pieced quilt blocks are the same size. I did not do this, so consequently, some of my quilt lines do not match. This may have been because I cut my own 5″ solid color squares or because my 1/4″ seam allowance was not always 1/4″.
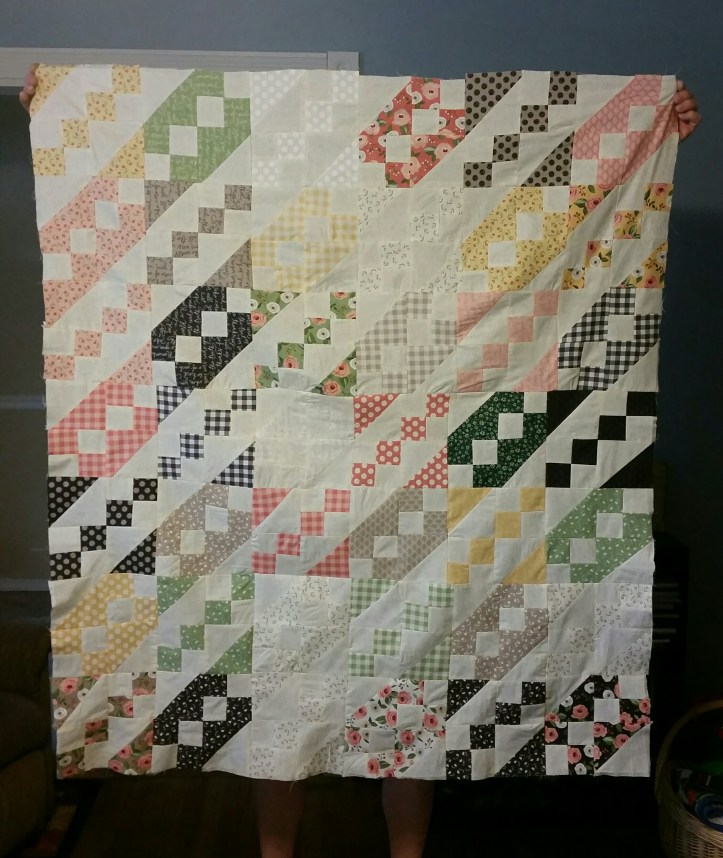
My husband was so kind as to be my quilt holder-upper again.
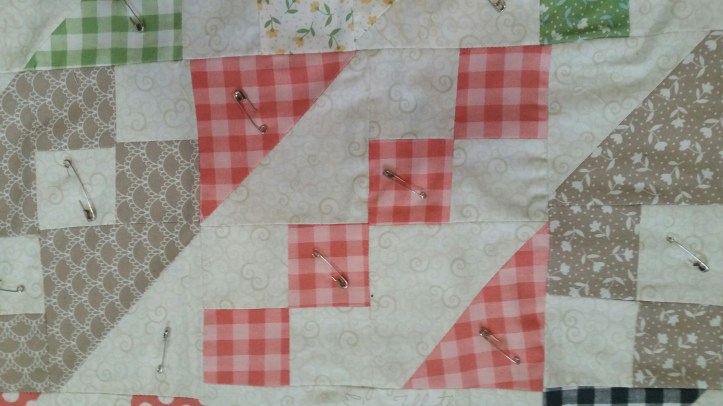
The next step…making a quilt sandwich. I really had no idea how to approach this as the only “quilt sandwich” I had ever seen was on a quilt frame in my grandma’s living room over fifty years ago. As with almost every question I have, I went to the source of all knowledge, Google and found an easy answer to my question…taping the backing fabric to the floor. All I can say is this was a quick and easy way of getting my quilt sandwich started but I’m lucky that it wasn’t any bigger or I would have had to move a lot more furniture to get it laid out.
The first step in making thequilt sandwich is to tape the backing fabric to the floor, right side down. To make sure the fabric lays flat, tape each opposing side; top and bottom, right side and left side, right upper corner and left bottom corner and left upper corner and right lower corner, smoothing each as you go. Once you have all the areas taped, lay your batting on top the fabric and then your pieced quilt on top of the batting.
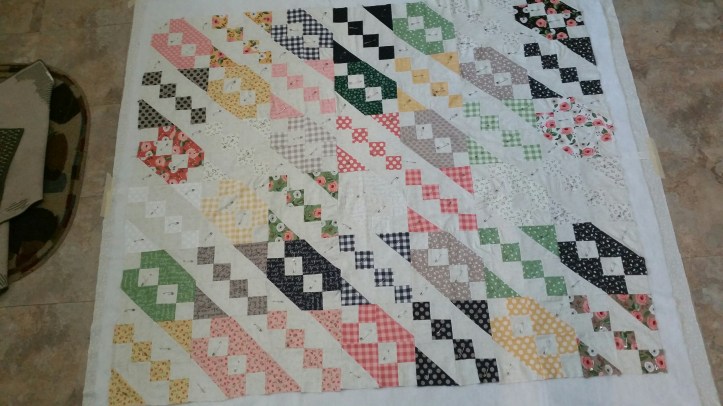
Use safety pins to pin all layers of the quilt sandwich together. Another interesting fact I learned is that safety pins, used for basting the layers, together come in different sizes. I always knew they did, but I never knew there were actual sizes:
- Size 00 or 2/0 = ¾ inch.
- Size 0 = 7/8 inch.
- Size 1 = 1-1/16 inch.
- Size 2 = 1-1/2 inch.
- Size 3 = 2 inches.
- Size 4 = 3 inches.
I bought a bag of safety pins at my local Walmart and most of the pins were size 2. There were a number of size 3 pins in the bag and I found the size 3 pins were much easier to use than the size 2s.
I was watching an old Andy Griffith show while I was doing this and thinking this was probably not the way Aunt Bee would have done it back in Mayberry RFD, but it worked well for me. My daughter called while I was in the process of doing this and she asked “whatcha doing?” My answer “Making a quilt sandwich”. I knew that would throw her and it did.
So, now it’s pinned and ready to be machine quilted. Stay tuned!

[…] following posts: Goal Oriented–Climbing Jane’s Ladder Climbing Jane’s Ladder II Climbing Jane’s Ladder Still Jane’s Ladder–Closer to the […]